Pages

Tuesday 29 November 2016

The woes of crafting at home.

Since June and the opening of Our Creative Den all my craft stuff has been there and I haven't done any paper crafting at home, just knitting and a little embroidery. I do lots of planning and researching ideas at home, but tonight I had something I had something I wanted to start.
So I bought some of the bits home with me. The other problem is I don't have any particular space to craft in so its on the sofa, eek better not get glue everywhere. The crochet hook has been used like a pokey tool. The tape measure as a weight/clam to help the glue dry. But its worked........


The starting materials.


The gluing process!!!


One complete flower. How christmassy is that in the lovely Stampin'Up 'This Christmas' lightweight speciality papers.

This is a completed sphere in paper from a book.


There is a workshop in Our Creative Den tomorrow night to make one of these, check us out online Our Creative Den


Monday 28 November 2016

Sale Extravaganza

Today is the last day of the Stampin'Up sale extravaganza. There are extra items for just this last 24hours as well those that have been on sale this week some with 40% discount.

In the one day 24hour sale today (28th) is the flurry of wishes set. My friend and I have a little challenge going to see what different colour ways we can think of, we have done some shockers but here are some of the best.


 This is the link to the online shop where you will find the sale here
This is the Flurry of Wishes Bundle with its code


I have some pink ones somewhere but I can't find the photos!  There is one in the catalogue in pink on page 29.
Happy shopping everyone.


Wednesday 23 November 2016

Project Life

Unfortunatly we have all been  hit by a tummy bug so not much crafting going on, but time has been spent checking out the Stampin'Up sale extravaganza that is on this WEEK.
The project Life 'Hello December' pack of cards and accessory pack has 30% off. So I have ordered both of them plus a pack of pockets, variety pack 2, this one has lots of little pockets 2" square. And the emerald envy 6 x 8 album.
My intention is to get all the family to send me pictures  of what they are up to in December to create a wider whole family album. To me this is the only way as we are a very widespread family.

I have also sat and watched one of Stampin'Ups videos about creating an album like this, its very informative, so for those of you who don't know much about project life I am going to try and include it here........ but you know all about my lack of IT skills

Ooops I thing the video has gone into a separate post! Make sure you watch to the end as she shows you some completed pages and they are great.


The card pack is here On this page in my online shop are all the other products in this suite. The accessory pack which has lots of little embellishments, the dates, wooden tress, silver stars, and tree paperclips plus a set of stamps which don't seem to be in the picture!


The album and the pockets.


Project Life by Stampin' Up! Hello December 2016


This video relates to the post above. I'm not sure why it has made itself a separate post..... another learning curve. Please watch particularly the last few minutes when completed pages are show. It looks brilliant. Then read the above!
Have a great day.

Monday 21 November 2016

An ongoing project

Last Saturday I spent the day wandering around Craft in the Pen in Skipton then on the journey home ended up pushing the car as we took the scenic route home and ended up in a blizzard before being stuck at almost the highest point! It was quite exciting although exhausting.
They today we have snow melt as well as lashing rain which has created a lot of water flowing. Unfortunately  the land drain in the field above us has got blocked so we have our own water feature. This is generally a yearly occurrence and I know that Alan the farmer will sort it out this week.

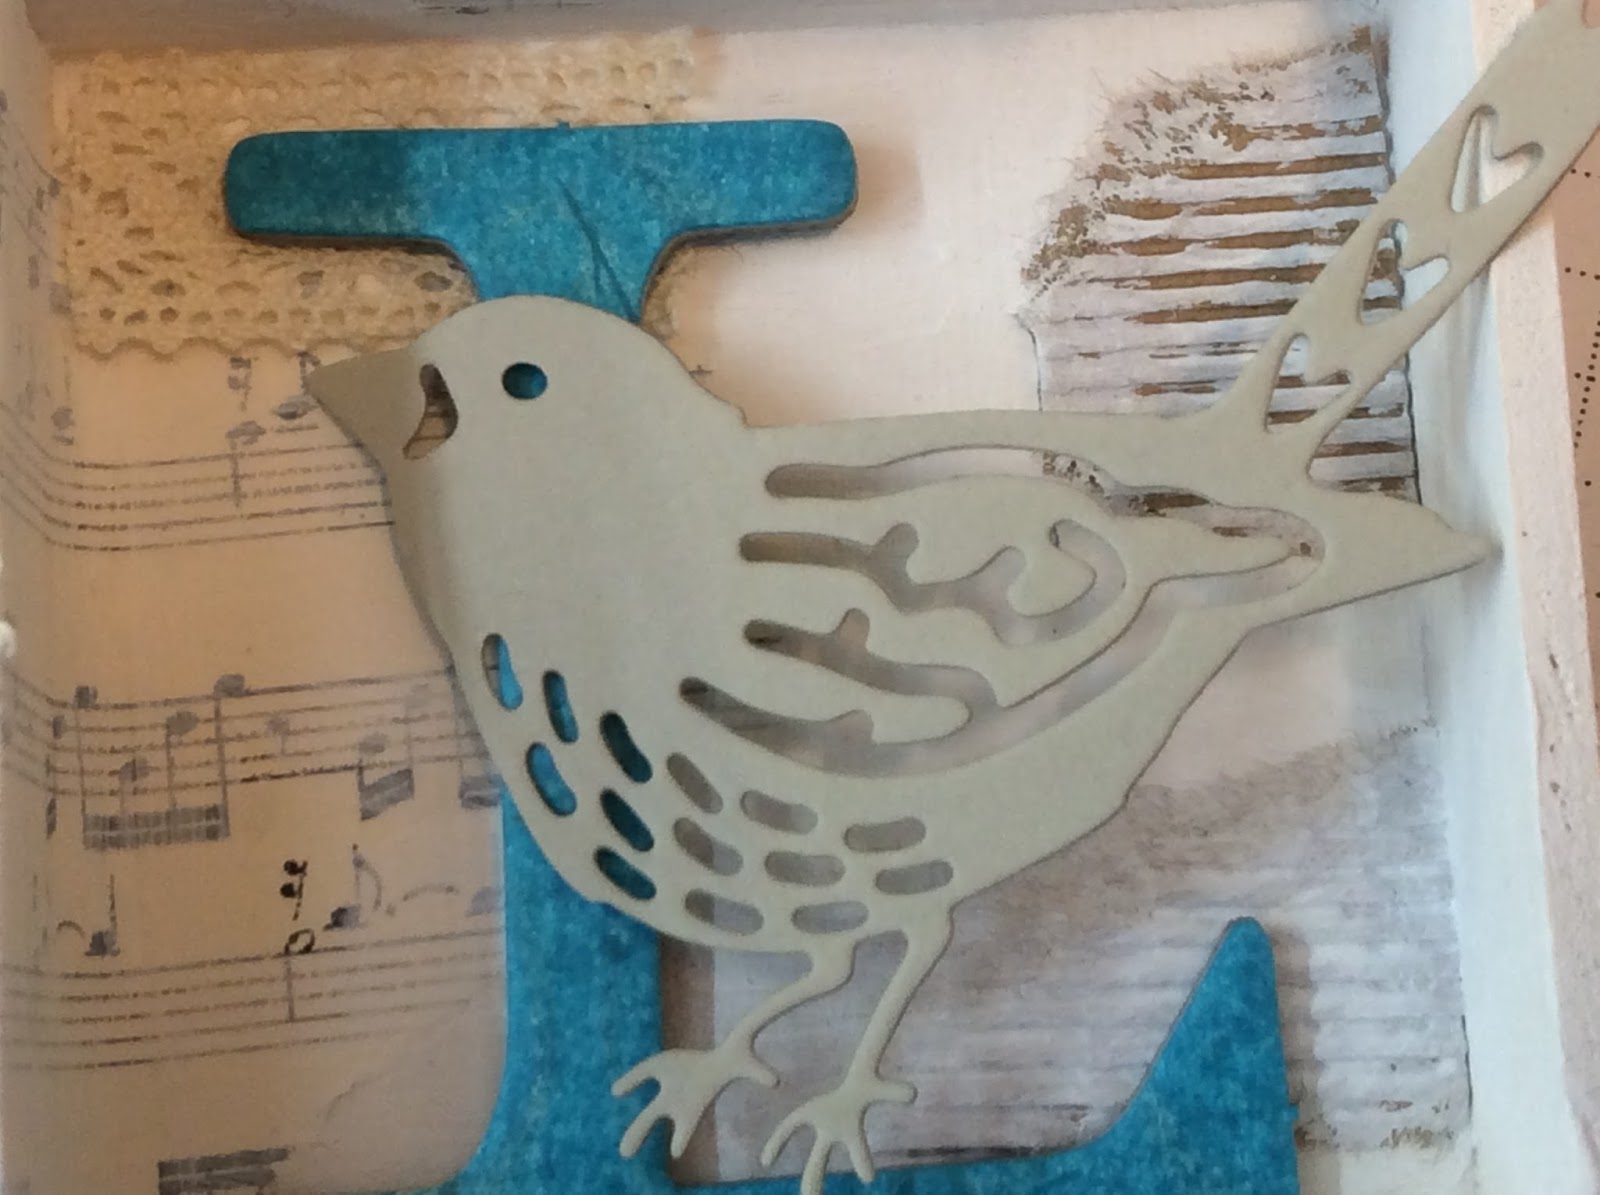
My on going project has now been in the making for a few weeks, I do a little bit when the whim takes me and I have time..... its not big or intricate but it is me. The letters are just laid on as are the birds, the only pieces in place are the background, bits of designer paper, corrugated paper and lace.


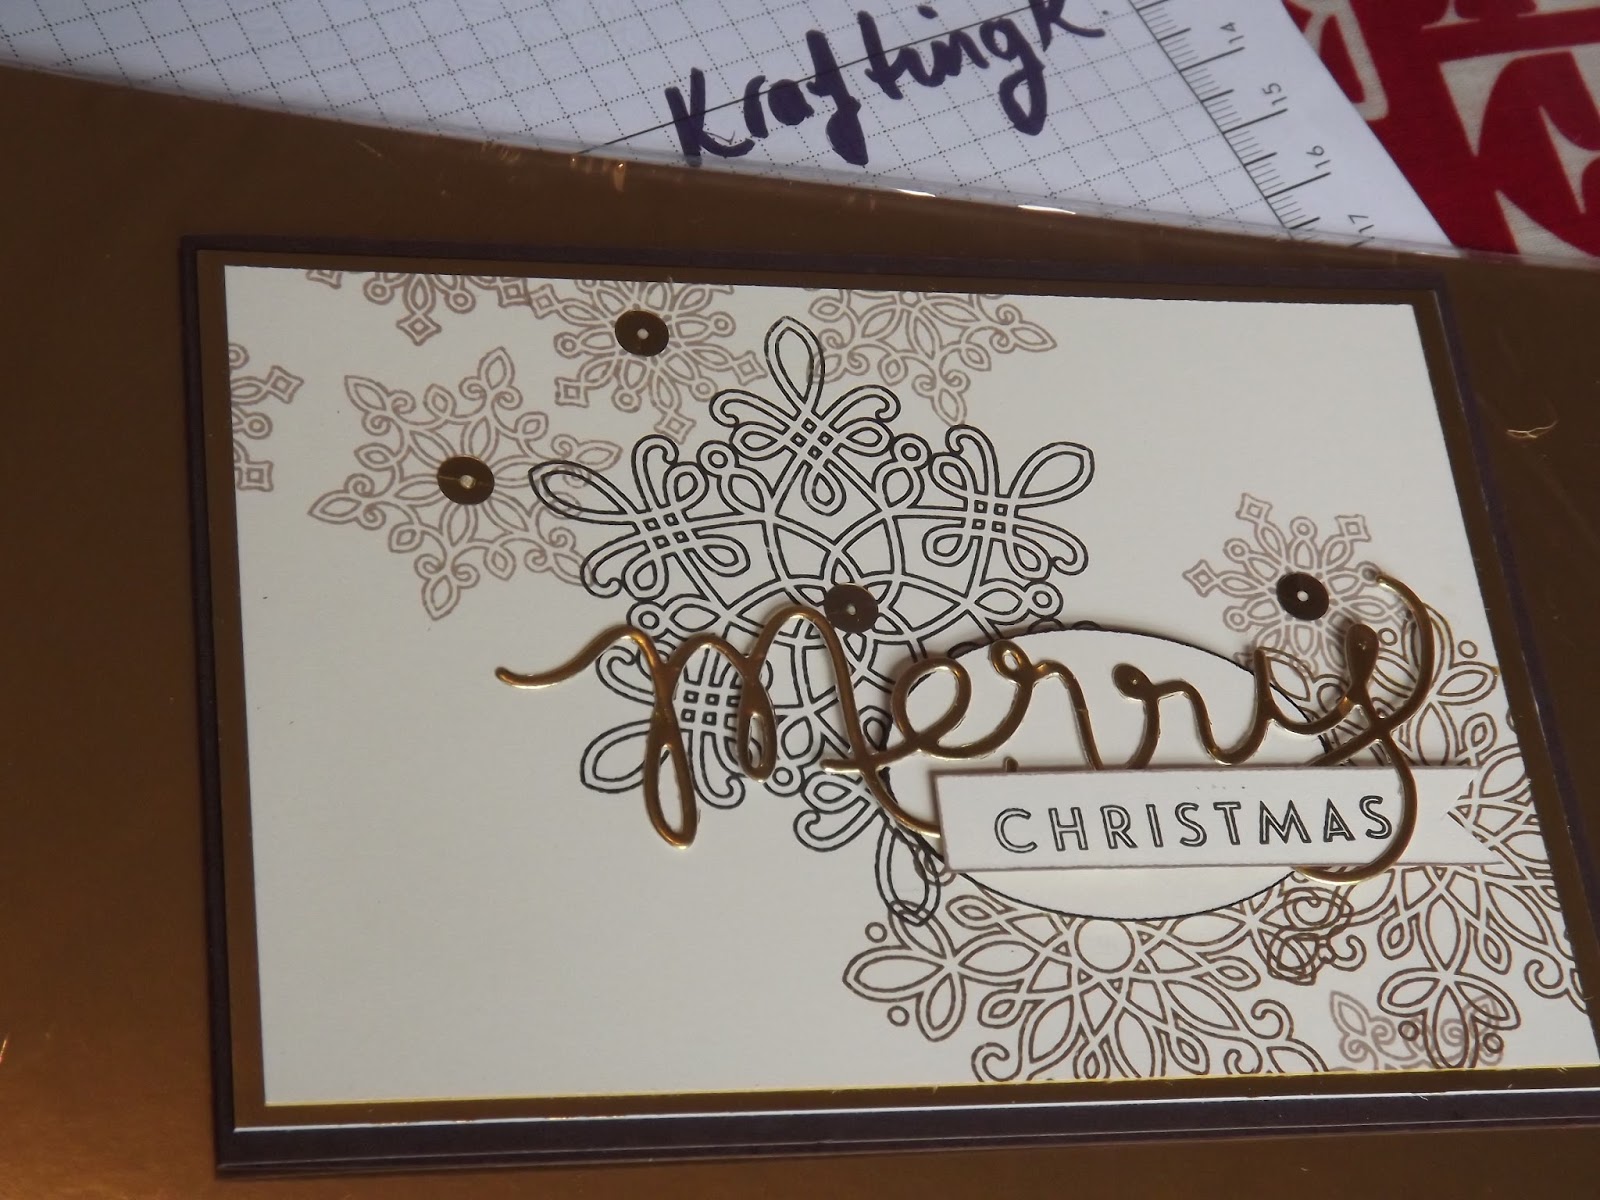
I love the wooden snowflakes, this will eventually be triple embossed, but I'm not sure in what colour yet.


 This is one of the Best Birds dies. cut from sahara sand card I will put some colour onto this, but what colour.


On the 'O' I have the die cut little wren from the same set, this also needs a little colour.


The bird on the 'E' is a stamped image from the 'Best Birds" stamp set. I have used the background stamp to add some colour to the bird, it does need some more work

And this is my unplanned waterfall!


Friday 18 November 2016

A Christmas Home Decor item - Christmas Sampler

Every Tuesday afternoon, two ladies come to class to create, they started 6 months ago as total beginners, neither had stamped before. They enjoy their couple of hours with us and are always amazed that they have produced something they are proud of. We have completed enough Christmas cards and a christmas garland so we are now moving onto a home decor item but have decided to do it over two weeks as there is so much work involved.

The sampler is  mixture of new and retired sets, the cookie cutter was a bit modern for the ladies so I have looked back to my stash to find something I knew they would like. I have also looked at all the techniques we have done and tried to use as many as possible, so its a bit of a revision course!


The pictures are not great this morning as its very dark outside. Just to complicate matters we have had a fire extinguisher put in the craft studio and it now stands out in the background of the best place for taking photographs, so do I have the fire extinguisher moved or do I find another place for taking pictures????

In terms of techniques we have water colouring, heat embossing, die cutting, punching,  daubing, stamping and bow tying which always seems to be the one that is found to be the most difficult there is a little bit of fussy cutting, wonder if you can spot that? 
More importantly can you spot the fire extinguisher?


Thursday 17 November 2016

Cookie Cutter - Reindeer

The simplest of the lot, once you work out stamping the reindeer upside down.  (See previous posts!)
Using some of the Candy Cane Lane designer paper again. This is the final card for a pack for a Christmas fair at the local primary school a week on Saturday. Its the reindeer. I think this one will be very popular.


I really like the Rudolph Reindeer the best!
The sentiment is from the Snow Place stamp set


What I have used:-
Cookie Cutter stamps and punch bundle Buying this as a bundle saves you £4.50
Snow Place
Real Red A4 card
Crumb Cake Card
Crumb cake and real red marker
Candy Cane Lane designer paper

These are all links to my online Stampin'Up shop.


Wednesday 16 November 2016

Cookie Cutter - Teddy Bear

The third simple card in this series brings you the teddy bear. We had a bit of a giggle in the den when I made this this morning. I stamped the bears, added the faces, then the ears, then I stamped the sentiment, cut the layers and put together, wham I added the punched out bears I realised they didn't have their ears! These have to be stamped separately and cut out as they are not part of the main body of the punch. How can you have a teddy bear with no ears!!!!

So cute

Once again a single layer od designer paper with the bears and the sentiment added with dimensionals.

The sentiment is lovely, I have used a retired punch to cut it out and the layering behind it.
 I have added a little of the fine tip glue to the eyes and nose to make them shiny. He is cute isn't he.


What I have used:-
Cookie cutter stamps and punch
Designer paper
fine tip glue 


Tuesday 15 November 2016

Cookie Cutter - Father Christmas

Using the same set as yesterday I chose the 'father Christmas for todays make and once again I have used some of the Candy Cane Lane designer paper and kept it simple.
This very stylised father christmas is not my thing but I wanted to create something simple with every stamp, next week we will have more technically challenging cards using this set.. Plus although I have used the reindeer stamp I haven't made a card with him so that is to do too.
My choice of paper dictated a little of the way I put this card together. The pattern reminded me of snow falling so out came the 'softly falling' embossing folder. The layers then just went together.


I have sometimes seen people use the embossed snow the other way up so every timeI use it  I now have to think as to which way it looks best.

He does look like a very jolly santa!


What I used - These items are all a link through to my online shop.
real red card
softly falling embossing folder
Cookie Cutter stamps and punch bundle
real red marker pen
Canndy Cane Lane designer paper

Monday 14 November 2016

Gingerbread Men

Another make today using the Cookie Cutter Set. Once again a simple card which also features the Candy Cane Lane designer paper and the stitched edge ribbon, I couldn't help myself and had to add a couple of the mini bells. They are so cute. No sooner had I finished this when 3 ladies came through the door and snapped it up so I had to set too and make another one!


They loved the gingerbread man with his little glittery red bow tie. I now have a couple of packs of cards to make for them. All featuring the gingerbread man.

The detail, bells and ribbon.
The designer paper is lovely and makes great backgrounds.


What I have used:- if you click on these items you will be taken directly to my online shop.
Cookie Cutter stamp set and Punch
Candy Lane Designer paper
stitched edge ribbon
mini jingle bells
real red marker pen
Real Red cardstock

Sunday 13 November 2016

Candy cane holders

A quick post for a quick make.  These were another make for  the craft fair. Pencils wrapped with washi tape, the bag is tied with another image from the cookie cutter. A cheap little buy for the children which proved popular.

Saturday 12 November 2016

Cookie Cutter Rudolph.......


During the fair today I had a make and take table, making a Rudolph gift card holder and thats my starting point.
I love the Rudolph and thats the only reason I bought the cookie cutter set although I now think the eskimo it cute too. I sat down to make a couple of cards and a gift card holder to do decide which to use as the make and take. I started with thereindeer stamp. I had a piece of scrap card that was square, stamping one reindeer on each side only to discover that the other parts of the punch took holes out of my reindeer so:-
I recommend you cut your card into 2" strips, then stamp the reindeer upside down, the punch then works fine.


He is cute isn't he and the gift card holder also uses the designer paper from the Candy Cane Lane pack.

What I used for the gift card holder


A4 crumb Cake Card here


Cookie Cutter Christmas Bundle here
Crumb Cake and Real Red Marker here

Friday 11 November 2016

Its Been a Week

Well its a long time since I went a whole week without blogging. Its just been hectic. I have my first Christmas Fair of the season tomorrow so I have been busy finishing off the many half completed projects as well as making lots of little bits for the fair.
Today I have pictures of how my craft stall will look. I always set it out and take pictures then when I get there tomorrow I will know what I am doing (hopefully)! I also plan on having a make and take and that is the base for my weeks post. Starting with a bit of advice about the cookie cutter set.....

The stall


So, what do you think of it. I must admit the studio now looks like.....well I'm sure you can imagine. Wish me luck for tomorrow.