Pages

Monday 30 November 2015

Day 6 of my 12 makes for a Christmas fair - Stars

We all need a star for the top of the tree and how often is it that that is the piece that goes missing when we clear up at the end of the festive season! I can't remember a year when I haven't had to buy a new star or angel for the top of the tree, everything else is there but not the star......

I have used up a few sheets of my retired paper stock, and I have plenty to use up. These stars are in the pictures of the seasonal catalogue. They really are easy to make, a little more fiddly to stick together so I have just tied them together.


Each star starts with 2 pieces of paper 6" square. They are then folded in half horizontally and vertically then corner to corner in both direction. 

Next you cut up the vertical and horizontal fold 1 1/4" 


Firmly crease each fold.


Next fold in from each cut length towards the diagonal fold. You do this on each point.


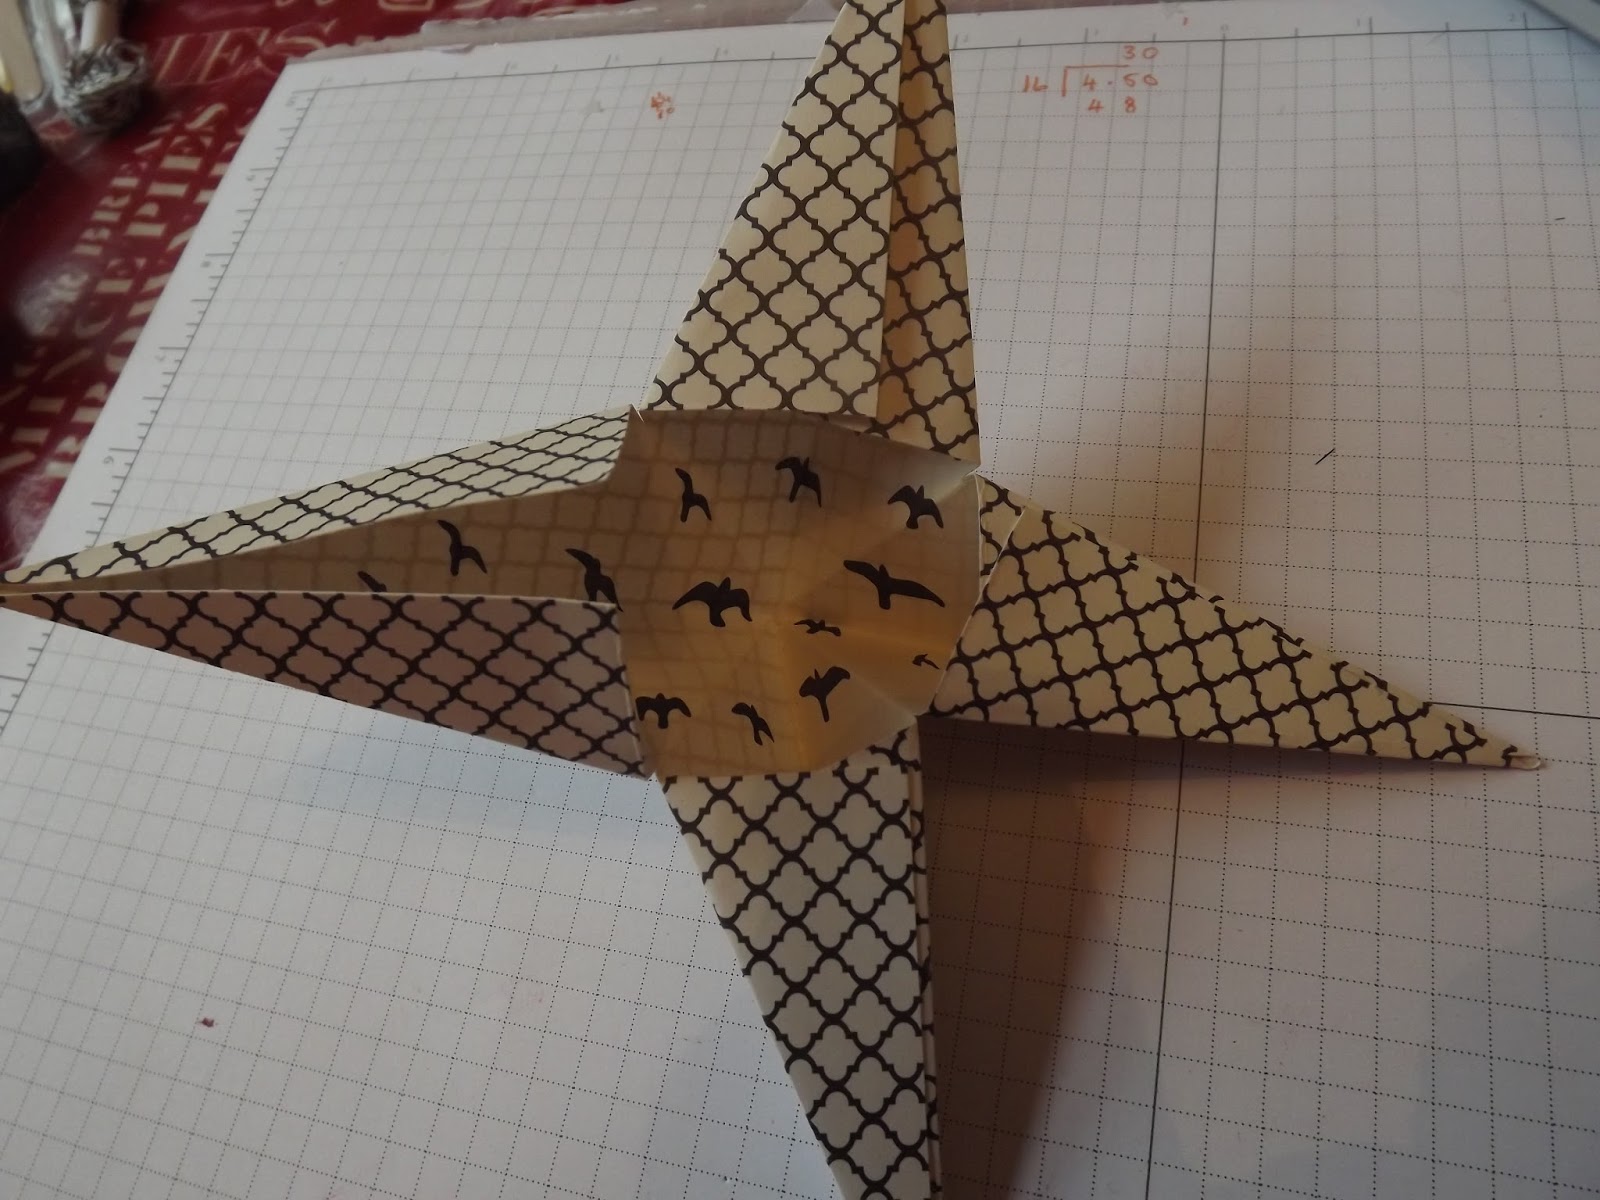
Once all the folds are done you stretch each folded piece over its opposite side and stick, this makes the points of the star 3 dimensional.                Work around the star until all 4 points are created. Repeat with the second piece of paper.

Once you have the two pieces folded and stuck place onto of each other, note where the stars touch. It is possible to stick together with glue dots. I have wrapped gold threaded bakers twine, tying at the point on front and back.


Sunday 29 November 2015

Day 5 of my 12 makes for a Christmas fair - decorated stars and a couple of trees.

These little wooden stars and trees have been in my stash for ages.

I have thought often about how to use them. I saw some lovely newsprint christmas tree cards at a craft fair a few weeks ago and thats when I had the idea of raiding my paper stash to cover the wooden elements.

After covering each one I have spent this morning putting little bits of embellishments together to decorate the stars and trees.


I don't think these pictures do them justice, they do look stylish, if they don't sell at the christmas fair they will be hanging on my tree.

Saturday 28 November 2015

Day 4 of my 12 makes for a Christmas Fair - Lanterns

Todays makes use vellum.
The little bags are made from 1/2 a sheet of A4 vellum. Then I have used a variety of embossing folders and for two of them I have used the star confetti punch around the top. It then took me quite a while to thread the tops to hang them on the tree!


They look lovely lit up in the dark. The embossing really stands out. I also made a couple of curvy keepsake boxes in the vellum and punched half of each one with star confetti punch.


Friday 27 November 2015

Day 3 of my 12 makes for a Christmas fair. Curvy Keepsake boxes.

I now have a bumper crop of curvy keepsake boxes. AND did you know you can fit 3 Lindor balls in each one, well that is what I have done. They would look great as place markers for a large Christmas dinner, with that little bit of chocolate for afterwards.


The pudding boxes are almost double layer as I have started with a brown box and then I have cut a white one. The white one is then cut to form the dribbles on each side. (cuts the base off). The leaves are cut freehand.


The robins use the brown box too. Then I have added the robins. The robin body is a punched red large oval, a brown circle for the face, a large long red triangle folded over at the top for the hat with a word window along the bottom of the hat. The little orange triangle has a small turned down piece at the back to stick it to the brown circle.


 The father Christmas is a bit different to the original as the moustache die is no longer available. I have used the festive flower punch, covering the join with a small pink circle. I have added a small silver glimmer circle to the end of the hat.


Oops this one looks like he has a blank eye. I don't know why its come out like that its OK in real life. I have never seen the film 'Frozen', but I understand its very popular.


The penguins are made of black card then the feet and beak from orange. The white body is made using the oval punch. The one of the front looks puzzled, wonder what he was looking at when I took the picture.


Ant this is whats inside....... yum yum.


Thursday 26 November 2015

Day 2 of 12 makes for a Christmas Fair - Plaques, snowmen and penguins!

I have already shown you one plaque with penguins on, its also on my crafting pinterest board and has been re pinned lots of times, that makes me think it would be quite popular. I didn't want to just do penguins so I have done a few with the snowmen. This stamp set has been great and of course the penguin is cute. Only 19 days left to buy this stamp set, if you hover over the picture of the stamp set at the bottom then click it takes you to the set in my online shop.

So.... these are the three snowman plaques I have made. The bottom one really shows up how you can highlight small elements with the fine tip glue, can you see how the top hat is shiny, thats the glue!


 The detail.....


The snowmen dressed in red, rather than sequins I have added stars punched out with the confetti punch of glimmer paper.


The detail, isn't the little snowman cute in his glossy bow tie.


The detail..... I love the snowman now with their shiny carrot noses. I only liked the penguins to begin with but the snowmen are cute too.


 Now for the penguins, yes they are cute. There are two blue and two red, all a little different from each other but similar in every way.


Do you have a favourite? I think the original one with the penguins in red is mine.