Pages

Tuesday 31 March 2020

Dressed to Impress, Little Handbags.

I'm not really a girlie girl and don't tend to go for those sort of stamp sets although I do enjoy flowers. However when I saw this bundle it was the one for me. I surprised myself!. I haven't made many cards yet but have lots of ideas. It was the bag die that I really wanted to get to grips with. Its one big die that you cut twice for each bag. I have made it 4 ways. Two I have made in card then covered with designer paper, the other 2 are made from designer paper.

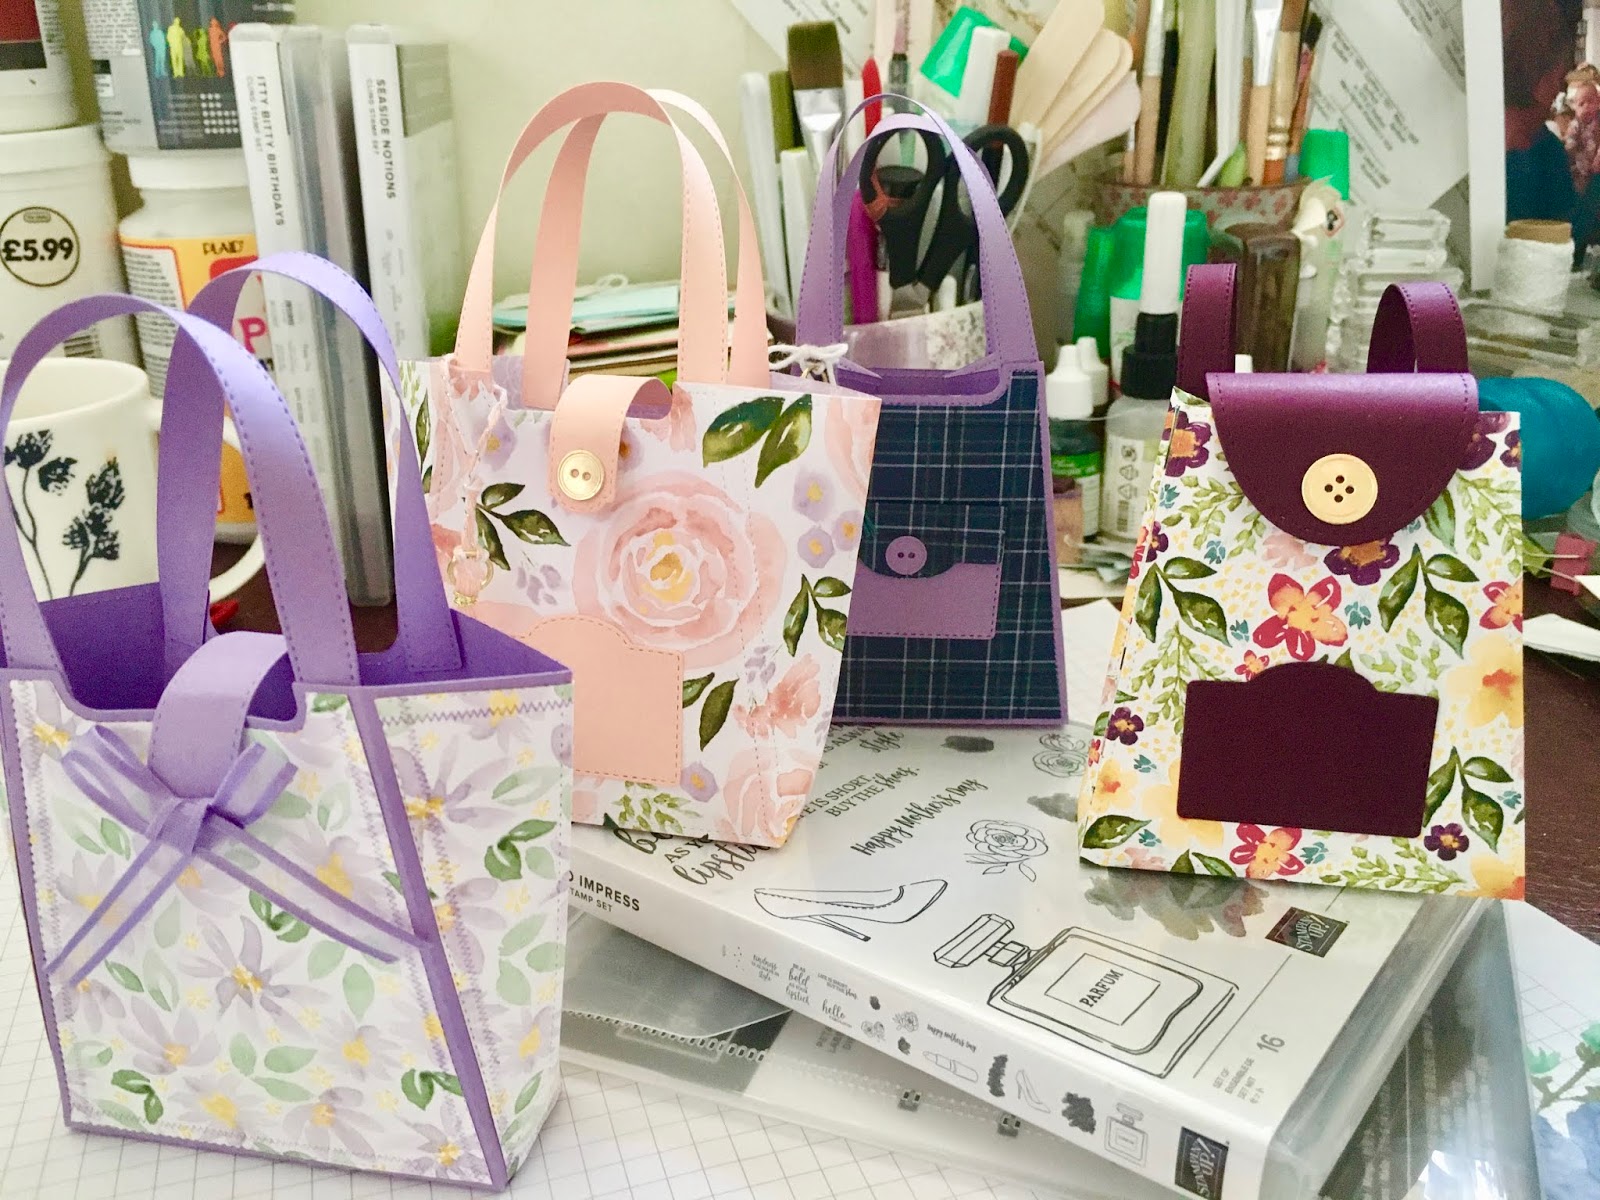
First is this little backpack. Made in designer paper with a matching card pocket, handles and clasp flap. The button is die cut from gold card. The die is included in the set.


Bag No:2 is made in card then I have die cut it in  designer paper and trimmed off along the stitching line. I die cut the pocket twice, turning the top down into a mini flap and covered with matching designer paper. I have decorated with a matching tassle. A packet of tassels is part of the bundle or can be bought separately. Both these bags have the ends folded in.


Now for two bags with the ends stretched outwards. This first one is in card with designer paper cut on the stitch line. No pocket. The clasp has a pretty bow in matching ribbon.


And finally another bag just made out of designer paper. The clasp has a matching button die cut in gold foil card. Plus another tassel.


All four bags......


Shopping.
The dies:-

The tassels:-

The Bundle:-


Monday 30 March 2020

Make It Monday

Every Monday I am going to do a Make It Monday offer.
This is a revamp of my parcel in the post.
I will post every Monday with a different stamp set and designs for parcel in the post.

In your parcel you will receive:-
The featured stamp set,
All the card, designer paper, ribbon and everything that you will need for the projects including envelopes.
A photograph of each card made up and a sheet of hints and tips for each card.
You will need to supply:-
Your own adhesive
your own blocks for the stamps
your own inks, an aqua painter or a fine paintbrush.


Monday 30th March - Healing Hugs - £25 including postage.

or £8 for just the materials,  plus £1.60 postage - no stamp set included.
4 cards


Order the parcel :- Email karen@krafting.co.uk


Sunday 29 March 2020

And more 'Thanks'

The last post of 'Thank You' cards for this week. Working through yet more designer paper. I have always thought this design of card looked good.
I have used the Healing Hugs stamp set, those big floppy,  rose blooms,  remind me of my Grandad's garden when I was a child. This is one of those *distinctive stamp sets. The stamped image has graduations of colour, giving it a depth. It makes stamping an impressive flower really easy. So 3 flowers and 3 butterflies.


Inside the cards with the verse is


I think this sentiment says it all.
Happy crafting k x


Saturday 28 March 2020

Thanks, Thanks, Thanks,

And another style of 'Thank You' card. Another old designer paper with these little plates. I loved the colour mix of these.


The first 4 cards, 2 in petal pink which I think is quite peachy coloured and 2 in melon mambo. 


And 6 of these little 3" square cards, 3 in petal pink and 3 in gorgeous grape. 
Aren't the papers pretty..... Happy crafting K x

Friday 27 March 2020

Thank You, thank you, thank you,

I have been making 'Thank You' cards. I wish I could make one for everyone working, isolating, shielding and staying a home, but I can't. I am sending the ones I have made to all those who have really helped us. I do have a compromised immune system, but am not in the government categories. Even before it was recommended that we stay at home my OH and I had decided that was the way we were going. We have now done just over 2 weeks without going anywhere. It's been ok because the weather has been good. Not sure how we will cope when the rain and grey skies are back. 
So my 'Thank You' cards......
This first one I really enjoyed making. The Stampin'Up! designer papers are always beautiful so using up the last bits for 7 of this style of card was a pleasure.


Do you remember this paper? 
Happy crafting everyone. k x

Thursday 19 March 2020

Ooops, meant to post this yesterday


It's been a funny old day, ending with our oven blowing the fuses in the house when we were cooking tea. Good job we still have a microwave. (only use it for porridge normally!) This was my desk this morning....... and this is my junk journal cover this afternoon. Loved doing this. Inspired by the Tracy Easson lesson in Savvy Supply School, part of mixed up creatives
I have made two more double pages which are hanging up drying. They are a bit sticky!!! Later in the week I will put it all together and make a little fat Junk Journal.

The other thing I want to say about this project is that everything is recycled. The material is from shirts, pj's, a skirt and other clothes that have been in my bag for ages, nice fabric but too far gone to send to the charity shop. The paper with Chinese writing came from emptying a box in the loft, I think the paper is from the 1970's when my family were in Singapore for a while and this was packing paper. The lace comes from the bottom of my grandma's sewing box, there was a big fat roll of it. I have used it over the years and  its got a lot thinner :( 
The sewing has been done with a thimble, the layers are quite thick. More buttons and embellishments to add.


The black and white stripe material is some ticking from the days when I did some re upholstery its been in my stash for over 20 years.


After I had been sorting the material and collecting together the bits I may use the room was a tip. This was my desk.


Stay healthy and keep crafting k x

Saturday 14 March 2020

Not crafting in the craft room but.........

So I haven't been in my craft room and put paper or ink or paint together for over a week. I 'm not sure why I just haven't got the mojo all of a sudden! I have done a bit of tidying and the pile of stuff to move on has grown but my hands have been busy doing something a bit different. Something I haven't done for many years and I have loved it.
I have made a small sampler using lots of embroidery stitches, some I had to research as I had forgotten how to do them!

On this piece there is Herringbone stitch, running stitch, not very straight, couching, the piece with the button has french knots. These are a bit of a thing with me, sometimes they work and sometimes they don't. I'm not sure I have them sorted yet.


On this edge I have added a piece of quilt, just using small straight stitches to attach it. I have done a little stitching across the piece. I then added  a very small piece of lace with two french knots, got to keep practising them! The K is done in cross stitch and the square next to that has a blanket stitched circle. On the outside of the grid I have stitched with daisy chain. 
 The bottom right corner has a larger pice of fabric to which I have added one piece of lace using a 1/2 cross stitch the small piece of lace has been attached with french knots. The button and piece of tape measure have been attached with small stitches. In the bottom corner I have added a small initial freehand.


Finally the lower left picture. The long piece is stitched with feather stitch. A new one to me. I have added the opposite colour on the end of each branch. The dark grey dots and french knots the red are just little straight stitches, a bit like couch stitch. The corner has a suffolk-puff in a lovely red and black print. The small piece of dark grey stripe fabric was the start of my french knot learning curve!


The whole piece is sewn onto and old fashioned blanker piece. 
I'm no expert but I have loved making this and I am really pleased with it..

Thursday 5 March 2020

Simple Stamping - Dressed to Impress

I am still finding #simplestamping really difficult. These two cards may not be classed as simple stamping by some but they are as simple as I can get!
I love these designer papers, only 6"x 6" but such a variety of designs.  You can fussy cut some, beautiful florals on others and simple background sheets, they are really versatile.  So using two of the designer papers that really chose themselves I have added a stitched die cut circle stamped with a sentiment then added a fussy cut stamped lipstick. The lipstick has been water coloured and I have actually painted the lipstick part with fine tip glue to give it a sheen which I can't pick up on the picture.


Love them both. Only question now is - do I put a sentiment in the inside?

The above is linked to the whole suite in my online shop


Above is the link for just the stamps and dies.
Above is the link for just the designer papers.

My Online  shop      please use this hostess code AGGXR7TT if you place an order over £25 .

I will send you a small gift in the post as a thank you.
Happy crafting k x


Wednesday 4 March 2020

Another project complete - knitting

This one has been on the go for ages. It's a really simple pattern but when you go wrong its almost impossible to pull back. I can't admit to how many mistakes there are, but there are plenty. As for sewing up, the part I really hate, it went together really easily. It looks huge, Jasper was only 1 last month so I'm not sure how long it will be before this fits him! lol. So glad its finished, now onto cricket jumpers!


Happy crafting k x

Tuesday 3 March 2020

Mixed Media 3D

Some weeks ago on my mixed media course with Mixed Up Creatives we had a lesson on dying our own card/paper using natural materials eg: tea bags, fruit teas, coffee etc.  we also did this with a variety of ribbon. With the died card we made flowers, no scissors involved, lots of water and tearing. I have made flowers like this before and always enjoyed it.

I have had the little base box for some time, it was the tray that a selection of wooden snowflakes came in some years ago. The red beads - no idea where they came from but I used some on my first ever project (a very long time ago) that I still have, I may show you later in the week!


I painted first, added a variety of papers to the inside of the little boxes. Arranged my flowers and leaves, then I stalled and the box sat on my desk for over a week. As I was clearing away  the little checked piece of ribbon fell onto the floor, when I picked it up gravity took over again and it settled in the corner of the box and just looked right. The button with ribbon and hessian was in my stash then the little red beads just brought the whole thing together.


I am really pleased now it is finished and I am quite pleased with it. Happy crafting k x