Pages

Tuesday, 15 September 2015

A very different 'Dove of Peace'. Coloured in and sponged.

You saw my dove of peace last Thursday for the make and take at my launch party well here it is again but very different.


Oh how I loved making this card. My hands looked like a rainbow when I had finished.
I started by stamping the dove, then colouring with the marker pens, I then used a mask to cover the bird. After looking through all my stamp sets I chose Everything Elenor and then Butterfly Basics. I stamped the background stamps with the colours I used for the sponging. For the sponging I started with the lightest of the colours, crushed curry, added calypso coral, real red, cherry cobbler and finally a touch of elegant eggplant. Finally I used the speckled stamp in the Georgous grunge set with real red around the edge.
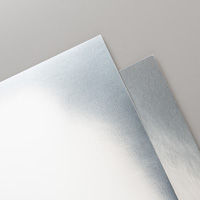
 Finally using the new Fine Tip Glue Pen I went over some of the colouring in on the bird. This leaves a fine trail of glue that dries clear, making the colour underneath shiny and raised. A bit like glossy accents but finer detail. It does need some time to dry.


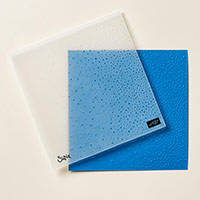
This picture is taken from the side, I have tried to show the raised effect the Fine Tip Glue Pen makes.
The sentiments are from the Holly Jolly Greetings set.


I have also done one in blues, I will show this later in the week.
Check out the classes page and choose the class you are going to come to.

Monday, 14 September 2015

Should be penguins.........

I did promise you penguins today but its not quite finished so we have a vision in 'White'.
I have used the 'Sleigh Ride Edgelits' and the 'Jingle All the Way' sentiments. On white, on white, on white. All three layers have been die cut in white. I have put the first layer through the big shot in the 'Softly Falling Snow' embossing folder. It really does conjure up the image of it snowing.
Here I have used the new silver corded trim for the edge of the hills. The three layers of white are mounted onto a black background then onto the Thick white card base. The sentiment is stamped in black. Effective or what???

 The sequins on the snow are silver not gold. Looks a bit odd!


The detail


What do you think of this one. I wanted to put a little robin in one corner but it was distracting, not that sure about the sequins but hey ho!
Check out the classes page to pick the class you are going to come to.

Stampin᾿ Up! Supplies
Table built by craftingbecky.com

Sunday, 13 September 2015

Final Flurry of Wishes

Here we have the final 2 cards in each colour way.

This is the first of the two cards.
For this one I have left much more space and just loosely stamped across from one corner to the opposite corner. I have still used the same snowflakes in the same colours as the one sheet wonder.


For the mat layer I have used the gold foil. Then die cut the word for the front. A few gold sequins add some bling so no need for ribbon.


For the blues I have used the silver foil for the mat layer then die cut the word in silver, silver sequins......no ribbon!


And for the final card I have tried something different. I have used the white ink......now I find this ink a bit 'claggy', I'm never sure if the image will be clear and it takes so much longer to dry that I usually end up smudging it everywhere. But I am happy to say the image has stamped beautifully and I got the heat gun out and gave it a blast to speed the drying up so no smudges. I have stamped on vellum, attached to foil, added a few sequins, a sentiment and a couple of fussy cut snowflakes.
On the gold and neutral colours I have added the gold corded trim from the seasonal catalogue. I now have a roll of the silver. It is really lovely and has a flat back so you can glue to the edges as you will see next week!
PS I have added the Stampin Up paper snips to the list of products as they really are the sharpest scissors I have ever used and have remained sharp over all the work I have done in the last 3 years. Just know they will keep on going, they are a must for your craft box. The large pair should have a health warning, more of that another time!


Stampin᾿ Up! Supplies
Table built by craftingbecky.com

Saturday, 12 September 2015

Flurry of Wishes

Today I have the other two cards I made from the one sheet wonder that created the 3 panel cards last Monday. Done in both colour ways, the neutrals and the festive blues. I still can't decide which set I like the best.....can you?


The mat layer has been made with the one sheet wonder that I stamped originally. It really is a quick way of making a number of cards in different styles. You should be able to get 4 cards from one sheet.
The individual snowflakes attached to the card fronts have been stamped on some scrap then fussy cut. There are 2 matching punches for this stamp set :- the first has the two smallest snowflakes on and comes as part of the bundle, the second is the flower medallion punch, this punches the middle size snowflake, which is the one in the picture above. The large snowflake I fussy cut.
I have used the lovely satin ribbon in cold and silver on one set of cards and the narrow gold and silver ribbon on the other pair. Have you decided which colour way you prefer?


Friday, 11 September 2015

Snow Place

I just couldn't resist this little fella in the Stampin' Up seasonal catalogue. But what am I going to do with him. Check back on Monday to find out.


Stampin᾿ Up! Supplies
Table built by craftingbecky.com